Open topic with navigation

Transfer In - Receive Individual Items via Grid Section
Revised: Wed March 1, 2023
If your transfer came in multiple boxes and you want to receive individual SKUs with the ability to edit quantities, you will use the grid section.
Quantity and Cost decimals are defined on the Transfer Out record > Options Hyperlink.
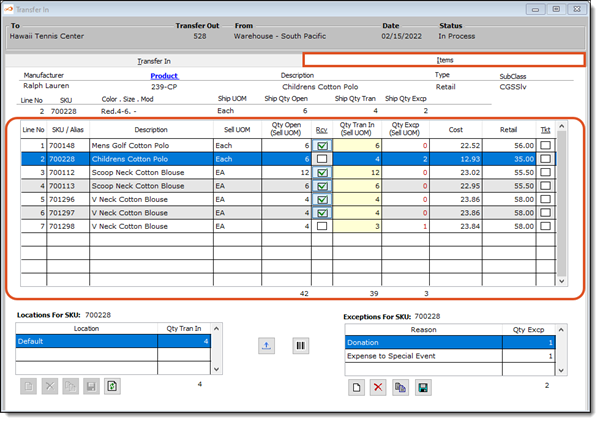
- Line No - This is automatically generated by the system and reflects the line number you are currently on.
- SKU/Alias - This is a read only field and is the SKU/Alias of the SKU being transferred.
- Description - This displays the description of the SKU as entered on the Product form.
- Sell UOM - This is a read only field and is the selling UOM (unit of measure) defined for this product. This may or may not be the same as the Shipping UOM. Remember, you can ship in one unit of measure and sell in another. For instance, you may transfer, or ship, in dozens but sell in eaches. If a unique name has been defined for the unit of measure, it will display here. Otherwise, the regular unit of measure name will display.
- Qty Open (Sell UOM) - This quantity is calculated by the system in the selling UOM. It reflects the quantity that still needs to be accounted for to complete the original transfer out record. This column is hidden if Hide is selected for your Employee Rights.
- Step 1: Rcv - From this column, you can receive all SKUs on this transfer, receive all SKUs for the highlighted SKU + Product, or receive individual SKUs.
- Receive Entire Transfer - Place your cursor in the header of the column until it turns into a down arrow, click once and then select "Entire Transfer". This will select everything that was shipped in this transfer. This assumes all the SKUs were received in full and no exceptions need to be entered.
- Receive Current Product - Place your cursor in the header of the column until it turns into a down arrow, click once and then select "Current Product". This will select all the SKUs that belong to the same product as the highlighted SKU. This assumes all the SKUs shipped with this product were received in full and no exceptions need to be entered.
- Receive Individual SKUs - Click inside the check box and the system will place a green check mark to indicate this SKU has been received. The quantity received will equal the open quantity amount.
- Receive Partial Quantity - Use the Qty Tran In Column to receive partial quantities. Partial quantities are quantities that differ from the Qty Open column.
- Step 2: Qty Tran In (Sell UOM) - This is the total quantity that you are receiving with this transfer. This quantity is in the selling UOM. This column can also be used to enter a partial quantity. For example, the transfer indicates 12 items were shipped but you only received 9 in this box. You would type 9 in this column to indicate you are partially receiving that particular item. Type in the quantity you are receiving. This amount should NOT include any exceptions that will be made.
- Step 3: Qty Excp (Sell UOM) - If you have Enabled Exceptions to Qty Transferred, type in the total amount that were damaged, missing, etc. Keep in mind, that if items are arriving in several boxes, you should not create an exception for "missing" items until all boxes have been received. Once this transfer is processed a Quick Physical will be created for the Exceptions you created.
- Cost - This is automatically filled in by the system and is the Average Cost of the item in the FROM facility when the transfer was created.
- Retail - This is filled in by the system and reflects the current retail price of the item.
- Step 3: Tkt - If you want to ticket all SKUs or individual SKUs you can with this column.
- Ticket All SKUs - Place your cursor in the header of the column until it turns into a down arrow, click once. This will place a check mark in the check box indicating you want to ticket all the SKUs. To undo, simply click a second time.
- Ticket Individual SKUs - If you want to ticket individual items, click inside this column. This will let the system know to add this SKU to a ticket batch.
HELP Did you know the system has a setting to:
1) Never flag items for re-ticketing
2) Always flag items for re-ticketing or
3) Flag them only if there is a price change ?
Go to Config > Configuration > Defaults > System Options > Other Tab > Re-Ticket for Transfer In to change the setting.
Regardless of the system setting, you can edit ticketing on each individual transfer in record. How about those apples!
At the bottom of the grid you will notice some read only total fields.
- Qty Open (Sell UOM) - This is the total quantity of items that are still outstanding from the Transfer Out record, displayed in the selling UOM.
- Qty Tran In (Sell UOM) - This reflects the total quantity that you have elected to receive on this transfer, displayed in the selling UOM.
- Qty Excp (Sell UOM) - This is the total quantity you have defined as exceptions to this transfer record.